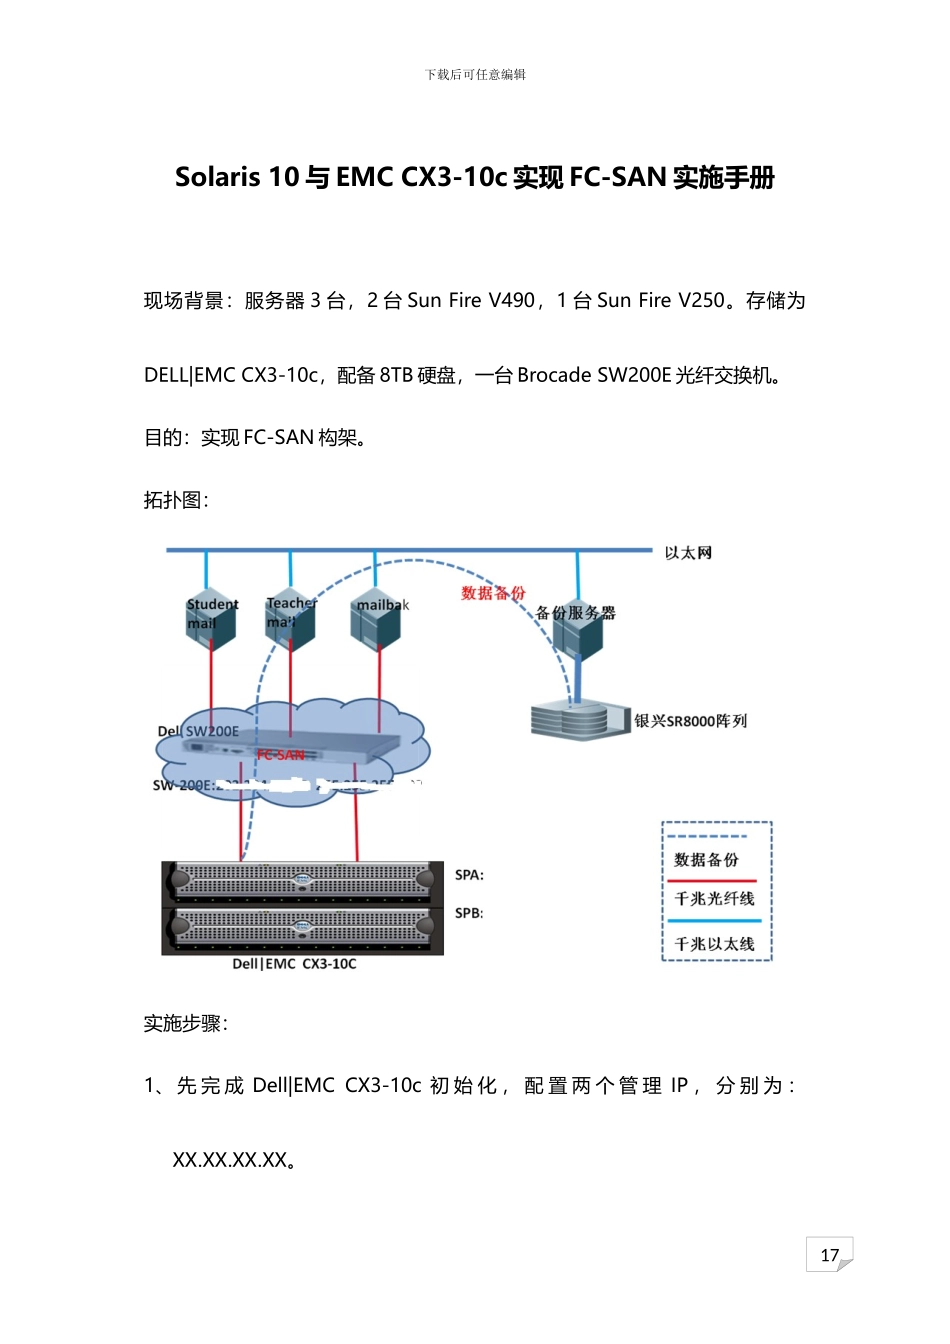
17下载后可任意编辑Solaris 10 与 EMC CX3-10c 实现 FC-SAN 实施手册现场背景:服务器 3 台,2 台 Sun Fire V490,1 台 Sun Fire V250。存储为DELL|EMC CX3-10c,配备 8TB 硬盘,一台 Brocade SW200E 光纤交换机。目的:实现 FC-SAN 构架。拓扑图:实施步骤:1、 先 完 成 Dell|EMC CX3-10c 初 始 化 , 配 置 两 个 管 理 IP , 分 别 为 :XX.XX.XX.XX。17下载后可任意编辑2、 建立服务器、光纤交换机、存储之间的链路。3、 初始化光纤交换机,配置管理地址:XX.XX.XX.XX4、 在 Navisphere Manager 管理界面发现链路。5、 在服务器端安装 Navisphere agent 注册,安装 PowerPath 多链路管理软件。具体安装操作如下:Navisphere agent 的安装与配置先将光盘 mount 上后,再执行下面的命令:pkgadd -d NAVIAGNT.pkg会出现下述提示信息,根据提示信息选择安装即可。Select the packages that you want to install by doing one of thefollowing:?? Enter 1 (to install the host agent)or?? Enter 2 (to install CLI) or Enter All (to install both the host agentand CLI)17下载后可任意编辑Enter y and y to begin the installation.The installation program looks for any agent configuration filesyou may already have on your system. If the program doesnot find any agent configuration files, then you have finishedinstalling the agent; go to step 10q. If the program does find anyexisting configuration files, it displays a message like the following:At Least 1 saved config file exists for NavisphereAgent.Please select 1 of the following:[1]Restore/etc/Navisphere/.Naviagent-config.000120:1059[2]Restore/etc/Navisphere/.Naviagent-config.000121:140817下载后可任意编辑[3] QuitSelect number 1 - 3.修改 agent.config 配置文件,主要方法如下:修改/etc/Navisphere/agent.configVi /etc/Navisphere/agent.config 修改内容为:# Navisphere agent.config# ---------------------# This file is used by Navisphere Agent to configure# site specific values.## All entries in this file have...